

Designing a scheduling application like Calendly or Acuity Scheduling is a great way to provide a more personalized booking experience for your clients or customers. Adalo makes it easy to create and customize a scheduling app without any coding required. In this tutorial, we’ll walk you through designing a scheduling application from scratch using Adalo.
How Adalo Can Help You Build A Custom App Without Any Coding Required
Adalo is a no-code app development platform that allows you to build custom apps without any coding required. It’s perfect for those who want to create a scheduling app as it offers a wide range of features and customization options. You can also check out my other article “How A No-Code App Development Platform Can Save You Time And Money” for more information about the subject.
If you don’t already have an Adalo account, you can create a free account here. Adalo offers a free plan which is perfect for those who are just starting out with app development. With the free plan, you can create your app from start to finish. You only pay once you’re ready to deploy your apps to Google Play and the Apple App stores.
Out of all of the no-code platforms, Adalo has the sleekest and most intuitive drag-and-drop visual editor. This makes it easy when designing a scheduling application without any coding required. Adalo also offers a wide range of components to use in your app, including a calendar component which is perfect for scheduling purposes.
The Basics Of Designing A Scheduling Application With Adalo
When you first open up Adalo, you’ll be greeted with the visual editor. This is where you’ll design and build your app without any coding required. To get started, you can either start from a blank canvas or choose from one of the pre-built templates.
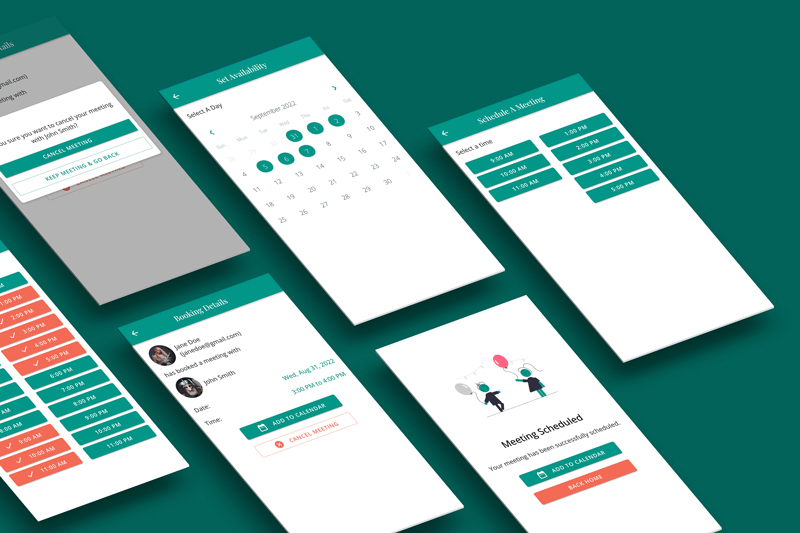
If you want to start designing a scheduling application of your own, you can even start with our “Book A Meeting” template that’s available for purchase on our Templar Design Adalo Template Marketplace.
By purchasing the template, you’ll dramatically reduce the amount of time and effort required to build your app. All you need to do is add your own branding, images, and text, and you’re good to go!
Purchase the “Book A Meeting” Adalo booking template from our marketplace today!
If you want to start from scratch, that’s perfectly fine too.
Creating The Database Collections For Designing A Scheduling Application
One of the first steps you’ll need to take when designing a scheduling application is to create your database collections. This is where you’ll store all of the data for your app, such as user accounts and all of the booking collections.
You’ll need 3 database collections to make this functionality work. A selectable times collection so that the admin can select the dates and times that are available for bookings, a booking days selection so that the admin can add specific days, and booking times so that the admin can add specific times to the dates selected.
Creating these collections is easy with Adalo’s internal database. Simply click on the “Database” tab on the left sidebar menu of the Adalo editor and click on the “Add Collection” button.
You’ll need number parameters in the database to store the data for each of these collections.
The selectable times collection will need number parameters to display the time and a time property calculated in UNIX time in order to set a booking time.
The booking days collection will need a date parameter to store the available days of the admin.
Last, the booking times collection will need the same parameters as selectable times but additionally will need a true/false boolean if the time has been booked by a user.
This means you’ll need a relationship parameter between uses and booking times to display the admin and an additional relationship parameter for the user collection to display the user that booked the time.
This can be a little tricky if you’re not familiar with UNIX time. UNIX time is the number of seconds that have passed since January 1st, 1970. You can use an online UNIX time converter to easily convert dates and times into this format. You can learn more about UNIX time here.
Building The Screens And User Interface For Your Scheduling App
After you’ve created your database collections, it’s time to start building the screens and user interface for your app. Adalo makes it super easy to jump in and start designing a scheduling application with its drag-and-drop visual editor. There are no drag-and-drop builders that can even come close to Adalo.

In order to begin designing a scheduling application, start by adding a screen called “Loading Splash” so that we can determine whether the user is an admin or not. Start with a blank screen and rename it. Add a countdown timer to this screen.
Add 2 new screens, Home Guest and Home Admin. These will be the 2 different home screens for our app depending on the user’s role. On the Loading Splash screen, add 2 links to the countdown timer with conditional actions to move the user to the guest or admin home screens based on their role.
The Home Guest screen will be used when the user is not an admin. This is where we’ll have our list of admins that the user can select from to book an appointment/meeting. Once an admin is clicked, it should link to a screen of the booking days. Once a user selects a booking day, link to a new screen to select the booking time.
The Home Admin screen will be used when the user has been authenticated as an admin. This is where we’ll have our list of bookings and a button linking to the “availability” settings for the admin.
On the Availability screen, you’ll need a date/time picker component or the marking calendar component by NoCode Monkey to select the date and create a booking day. Link to a new screen that contains a list of Selectable Times. You can purchase the marking calendar component from the Adalo component marketplace within the Adalo editor.
This next part can get tricky. You’ll need to add a custom list of selectable times that, when clicked, creates a booking time for the admin. You’ll also need a way to show that the booking time has been created, so you can do this by nesting another button right below the selectable time.
Make this new button a list of Booking times where the booking time name is equal to the selectable time name. You need to set visibility settings on both buttons so that they are only visible when either a booking time already exists or not. You can use the second button to delete the created booking time if the time is no longer available for the admin.
Extending The Functionality When Designing A Scheduling Application

I recently held an Adalo mentoring session with a client that purchased my “Book A Meeting” template, which is exactly the setup that I’ve outlined here in this blog post. He wanted to extend the functionality of the booking process. He wanted to know if it was possible to generate a Zoom conference link when a user books a meeting with the admins.
I’ve never used Zoom’s API before but it was very straightforward. My client provided me with the credentials required for the account and we set up an integration using Make (formerly known as Integromat).
If you’re not familiar with Make, it’s a no-code platform that allows you to connect different apps and services together using APIs and a visual builder. It’s perfect for situations like this where you need to add additional functionality to your app without having to write any code.
In order to customize this functionality for my client, I had to create a scenario in Integromat that fires through a webhook when a booking is created by an app user. The webhook triggers a series of actions that create a meeting in Zoom and generates a link that is then sent back through the Adalo API to update the “booking time” with the Zoom link URL.
Designing A Scheduling Application From Scratch With Adalo Conclusion
Designing a scheduling application from scratch with Adalo is a great way to learn how to use the platform and get a feel for its potential. In this blog post, we’ve gone over the basics of designing a scheduling application and some ways that you can extend the functionality.
You can even purchase the template that I’ve outlined here in this blog post and use it as a starting point for your own app from our Templar Design Adalo Template Marketplace.
All of our templates are guaranteed to function properly and come with full support from me and my Templar Design professionals. If you have any questions or need help getting started, feel free to reach out to us anytime through the live chat icon in the bottom right corner of our website.
If you have any questions about the “Book A Meeting” template or designing a scheduling application, feel free to drop a comment below!

0 Comments