E-commerce apps have become an essential part of the retail industry, allowing businesses to reach more customers and generate more sales. However, building a fully functional e-commerce app from scratch can be a daunting task, especially for those without technical knowledge or coding experience. That’s where Adalo comes in. Adalo is a no-code app builder that enables you to create professional-looking, feature-rich e-commerce apps without any coding knowledge. In this post, we’ll walk you through the step-by-step process of how to design an e-commerce app with Adalo, step by step. From setting up your account to publishing your app to the app store. So, let’s get started!
In this post, we’ll cover the following steps:
- Creating a new app in Adalo
- Setting up your app’s database
- Designing your app’s user interface
- Adding e-commerce functionality to your app
- Testing and publishing your app
By the end of this post, you’ll learn how to design an e-commerce app with Adalo that you can use to sell products to your customers. So, let’s dive in and see how easy it is to create an e-commerce app with Adalo.
Step 1: Creating a New App in Adalo
The first step in designing an e-commerce app with Adalo is to create a new app in your Adalo account. Here’s how:
- Log in to your Adalo account or create a new Adalo account here: https://www.adalo.com/
- Click on the “Create A New App” button on the dashboard.
- Select whether you want to build a native mobile app or a desktop web app.
- Enter a name for your app and select a template to start from (optional).
- Click on the “Create App” button.
Once you’ve created your new app, you’ll be taken to the Adalo app editor, where you can start designing your app’s user interface and adding functionality to it. We recommend going through the branding and setting tabs on the left sidebar panel to set up the initial look and feel of your app. You’ll be able to add your app’s name, description, icon, brand colors, and brand fonts.
It’s worth noting that Adalo offers a range of pre-built templates for e-commerce apps that you can use to get started quickly. These templates come with pre-built screens, layouts, and functionality, which you can customize to fit your brand and product offerings.
However, if you want more control over your app’s design and functionality, you can start from scratch and build your app from the ground up.
Overall, creating a new app in Adalo is a straightforward process that shouldn’t take more than a few minutes. Once you’ve created your app, you can start designing and building your e-commerce app’s user interface and functionality.
Step 2: Setting up Your App’s Database

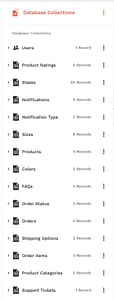
To create an e-commerce app with Adalo, you’ll need to set up a database to store your products, orders, and order items. Here’s how:
- Click on the “Database” tab in the Adalo app editor.
- Click on the “Add Collection” button.
- Enter a name for your collection, such as “Products.”
- Add fields to your collection for each product attribute you want to store, such as name, description, price, and image.
- Repeat steps 2-4 to create collections for orders and order items.
- Set up relationship parameters to connect each collection to the others. For example, you can set up a “one-to-many” relationship between the “Orders” collection and the “Order Items” collection, with each order having multiple order items.
Once you’ve set up your app’s database, you’ll be able to start adding and retrieving data from it using Adalo’s visual database editor and pre-built components. This will enable you to create a fully functional e-commerce app that can handle product listings, customer orders, and order fulfillment.
Setting up your database may take some time, especially if you have a lot of products or complex relationships between your collections. However, Adalo’s visual database editor makes the process much easier than building a database from scratch, even if you have little or no coding experience.
With your database set up, you can move on to the next step for how to design an e-commerce app with Adalo, designing the user interface and adding e-commerce functionality to it.
Step 3: Designing Your App’s User Interface

Designing your app’s user interface is an important step in creating an e-commerce app that is easy to use and visually appealing. Here are the screens that you’ll need to create and how they link to each other:
- Home Screen: This is the first screen that users will see when they open your app. It should include a logo, a search bar, and navigation links to other parts of your app, such as product categories, cart, and account.
- Product Categories Screen: This screen should display a list of product categories that users can browse. Each category should link to a Product List screen.
- Product List Screen: This screen should display a list of products within a selected category. Each product should link to a Product Detail screen.
- Product Detail Screen: This screen should display detailed information about a selected product, such as its name, description, price, and image. Users should be able to add the product to their cart from this screen.
- Cart Screen: This screen should display a list of items that the user has added to their cart, along with their prices and quantities. Users should be able to edit the contents of their cart and proceed to checkout.
- Checkout Screen: This screen should prompt users to enter their shipping and payment information. Once the user has completed checkout, they should be taken to an Order Confirmation screen.
- Order Confirmation Screen: This screen should display the order details, including the order number, shipping address, and estimated delivery date. Users should also receive an email confirmation of their order.
When designing your app’s user interface, it’s important to keep the user experience in mind. Make sure that your app is easy to navigate and that users can find what they’re looking for quickly and easily. Use high-quality images and clear descriptions to showcase your products, and make the checkout process as smooth as possible to reduce cart abandonment rates.
With your user interface designed, you can move on to adding e-commerce functionality to your app.
Step 4: Adding E-commerce Functionality to Your App
In order to fully understand how to design an e-commerce app with Adalo, you’ll need to start adding the functionality that allows users to browse products, add them to their cart, and complete purchases. Here’s how to add the e-commerce functionality as you’re learning how to design an e-commerce app with Adalo:
- Create an Order: When a user logs into your app, you’ll need to create an order in your app’s database. To do this, you can use Adalo’s “Create Record” action to create a new record in your “Orders” collection. This record should include the user’s shipping and payment information, as well as a list of the items they’ve purchased.
- Use Stripe for Payments: Stripe is a popular payment gateway that allows you to securely process credit card payments in your app. To use Stripe, you’ll need to create a Stripe account and connect it to your app using Adalo’s Stripe integration. You can then drag the Stripe component onto your checkout screen and set the amount to the sum of the order items..
- Send Confirmation Email: After a user completes a purchase, you’ll want to send them a confirmation email that includes their order details. To do this, you can use a third-party email service such as Mailjet or SendGrid. Adalo can integrate with both using custom actions via API.
By adding these e-commerce functionalities to your app, you can provide a seamless shopping experience for your customers while also simplifying the order management process for your business. It’s important to thoroughly test your app’s e-commerce functionality before launching it to ensure that everything works as expected.
Overall, the learning curve for how to design an e-commerce app with Adalo is relatively low. Adalo makes it easy to add e-commerce functionality to your app without any coding experience. With Stripe integration and email service integrations available, you can create a secure and efficient shopping experience for your customers while also streamlining your business processes.
Step 5: Testing and Publishing Your App
Testing your app is an essential step in the app development process, as it allows you to identify and fix any bugs or issues before launching your app to the public. Here’s how to test and publish your e-commerce app with Adalo:
- Preview Your App: Adalo offers a preview mode that allows you to test your app within the Adalo editor. Use this mode to test your app’s functionality and user interface on the web.
- Test Your App’s E-commerce Functionality: Before launching your app, it’s important to test its e-commerce functionality thoroughly. Make sure that users can browse products, add them to their cart, and complete purchases without encountering any errors.
- Test on “Internal Testing” & “TestFlight: Upload your apps to the Apple App Store and Google Play to test the app on real devices. This will allow you to experience the app as a real app user.
- Publish Your App: Once you’ve thoroughly tested your app, you can publish it to the app store. Adalo offers integrations with both the Apple App Store and the Google Play Store, allowing you to publish your app to both platforms simultaneously. Follow the instructions provided by Adalo to create an app store listing, set pricing and availability, and submit your app for review.
- Market Your App: After publishing your app, it’s important to market it to your target audience to generate downloads and sales. You can use a variety of marketing channels, such as social media, email marketing, and paid advertising, to promote your app and reach more potential customers.
When testing and publishing your app, it’s important to keep in mind the app store’s guidelines and requirements. Make sure that your app complies with all relevant regulations and guidelines to avoid having it rejected or removed from the app store.
Overall, Adalo makes it easy to test and publish your e-commerce app to the app store. By thoroughly testing your app’s functionality and marketing it effectively, you can create a successful e-commerce app that generates sales and drives business growth.
How to Design an E-commerce App with Adalo: A Step-by-Step Guide Conclusion

In conclusion, learning how to design an e-commerce app with Adalo is a straightforward process that doesn’t require any coding experience. With Adalo’s intuitive visual editor, you can create a professional-looking app that’s easy to navigate and provides a seamless shopping experience for your customers.
By following the steps outlined in this guide, you can create an e-commerce app that includes all the necessary features, such as product listings, shopping cart, and checkout functionality. You can also customize your app’s design and functionality to fit your brand and product offerings.
If you’re looking for 1-on-1 Adalo mentoring or need a quote for your app, feel free to reach out to us. Our team of experts is available to provide guidance and support throughout the app development process.
So what are you waiting for? Now that you know how to design an e-commerce app with Adalo, you can start designing your e-commerce app today and take your business to the next level!


0 Comments